Why standard macro lenses have limits
A standard macro lens gives you 1:1 magnification — meaning your subject appears on the sensor at its actual real-world size. For most mushroom photography that is plenty. But once you start photographing subjects under about 5mm, things change fast. Slime mold sporangia can be smaller than a grain of sand. At 1:1 they barely register in the frame, let alone reveal the extraordinary detail they actually contain. To get that detail, you need to go beyond 1:1, and extension tubes and the Raynox DCR-250 are the most affordable ways to do it.
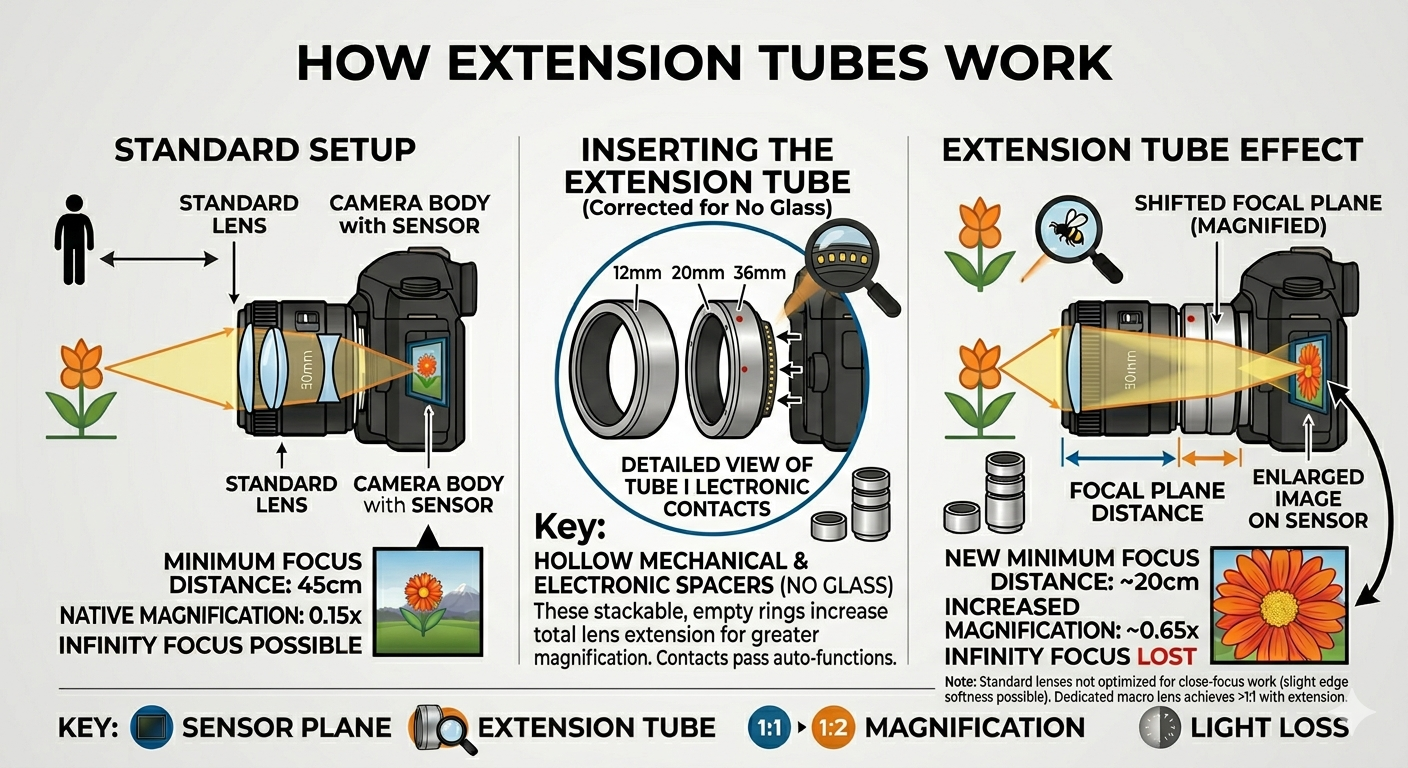
How extension tubes work
Extension tubes are hollow rings with no glass in them at all. They fit between your camera body and your lens, physically moving the lens further away from the sensor. This forces the lens to focus much closer than it was designed to, increasing magnification in the process.
They typically come in sets of three rings of different lengths (around 10mm, 20mm, and 36mm) that you can use individually or stack together for progressively more magnification. The more extension you add, the closer your minimum focus distance becomes and the larger your subject appears on the sensor. A dedicated macro lens with a 25mm tube takes you comfortably beyond 1:1 with very good optical quality. With a non-macro lens the results are also good, though not quite as sharp at the edges since standard lenses are not corrected for close-focus work the way macro lenses are.
Extension tubes by system
Olympus / Panasonic Micro Four Thirds
10mm + 16mm set with full autofocus and electronic communication. Works with Olympus and Panasonic MFT bodies and lenses.
More InfoNikon Z-mount (mirrorless)
11mm + 18mm full frame set with autofocus. Compatible with Z5, Z6, Z7, Z50, Z6II, Z7II, Z30, Zfc, Z8.
More InfoNikon F-mount (DSLR)
12mm + 20mm + 36mm set with autofocus for Nikon AF and AF-S DX and FX SLR cameras.
More InfoFujifilm X-series
Three-piece AF set compatible with X-E3, X-Pro2, X-T series, and other Fujifilm X-mount mirrorless cameras.
More InfoCanon EF / EF-S (DSLR)
Autofocus-compatible set for Canon EF and EF-S mount DSLR bodies including the 5D, 6D, 7D, 90D, and Rebel series.
More InfoHow the Raynox DCR-250 works
The Raynox DCR-250 takes a completely different approach. Instead of moving the lens away from the sensor, it clips onto the front of your existing lens and functions like a powerful magnifying glass placed in front of it. It contains two lens elements that shorten the minimum focusing distance and boost magnification by roughly 2.5x. Combined with a 1:1 macro lens, this gets you to around 2:1 to 2.5:1 magnification — meaning your subject appears on the sensor two to two and a half times its actual size. For subjects in the 2mm to 8mm range, this is often exactly what you need.
It attaches via a snap-on mount that fits any lens with a filter thread between 52mm and 67mm, and it clips on and off in seconds. That speed is one of its biggest advantages in the field. You can carry it in a jacket pocket and snap it on the moment you spot something tiny. It costs around $75, making it one of the best value accessories in macro photography.
Raynox DCR-250 Super Macro Snap-On Lens — $75
Fits filter threads from 52mm to 67mm via universal snap-on mount. Works on any compatible lens and is small enough to carry in a jacket pocket. One of the best value macro accessories available.
More Info46mm to 43mm Adapter Ring (for Olympus 60mm Macro)
Required to attach the Raynox DCR-250 to the Olympus M.Zuiko 60mm f/2.8 Macro, which has a 46mm filter thread smaller than the DCR-250’s snap-on range.
More InfoExtension tubes vs Raynox: quick comparison
| Extension tubes | Raynox DCR-250 | |
|---|---|---|
| Contains glass? | No — no optical degradation | Yes — slight quality reduction possible |
| Image quality | Excellent with macro lenses | Very good with macro lenses |
| Magnification control | Flexible — stack tubes to vary | Fixed 2.5x boost |
| Speed in the field | Requires remounting the lens | Snaps on and off in seconds |
| System compatibility | Mount-specific | Works on any 52-67mm thread lens |
| Loses infinity focus? | Yes | Yes |
| Price | $30 to $80 | ~$75 |
Combining them for super macro
Using both together is where things get genuinely exciting for slime mold and tiny fungi photographers. A dedicated macro lens plus a 25mm extension tube plus the Raynox DCR-250 stacked together can get you to 3:1 magnification or beyond. At that level, a 1mm slime mold sporangium fills a significant part of the frame and you start seeing surface texture, colour, and structure that is completely invisible to the naked eye. Sporangia look like tiny iridescent globes. Spore masses look like coloured clouds. It is a completely different world.
Some of the most remarkable slime mold and tiny fungi photographs taken in the field use exactly this kind of combination setup. The results compete with what basic microscope setups can achieve, while still being portable enough to carry into a forest. Stacks at this magnification typically need 50 to 150 frames depending on subject size, so patience and a stable tripod are essential.
The real downsides
Depth of field becomes extremely shallow
At 1:1 macro, depth of field is already measured in millimetres. At 2:1 or 3:1 it is measured in fractions of a millimetre. A subject 2mm tall can easily require 50 to 100 frames to cover completely. This is manageable but it does mean longer sessions and more processing time.
You lose infinity focus
With either accessory fitted, your lens can only focus at close range. Not a problem during a dedicated macro session, but worth knowing if you want to switch quickly to shooting something at a distance.
Light gets harder to manage
As magnification increases, the front of the lens gets physically closer to the subject, which makes it easier to cast shadows and harder to get light where you need it. At 2:1 or higher, a small LED panel or macro ring flash often becomes necessary rather than optional.
The Raynox snap-on is not completely secure
The clip-on mount is convenient but not as reliable as a threaded connection. On a lens pointed downward, particularly in wet conditions, be conscious of it. Most photographers never lose it, but it is worth being aware of.
Practical tips
Keep the Raynox in a jacket pocket, not the camera bag. The whole point of it is quick deployment in the field. If it lives at the bottom of a bag, you will use it far less.
Use a remote shutter release or your camera’s self-timer at high magnification. Even pressing the shutter button on a sturdy tripod can introduce enough vibration to blur a frame at 2:1 or 3:1.
Early morning tends to be the best time for extreme close-up work outdoors. The air is usually stiller, and wind is the biggest enemy at these magnification levels.
If you are building a macro kit and have not yet settled on a lens, check out the guide to macro lenses for mushroom photography first. And if you are considering buying a used lens to pair with these accessories, the used macro lens buying guide covers what to inspect before you hand over money. For the camera side of things, the focus stacking cameras article is a good starting point, and if you are new to the Olympus system, the Micro Four Thirds explainer covers why that system works so well for this kind of photography.
Best of luck out there.
No responses yet